Difference between revisions of "BX:Mail:Configuring Thunderbird under linux"
From CCGB
| Line 5: | Line 5: | ||
* Click ''Add Account'' | * Click ''Add Account'' | ||
* Select ''Email account'' | * Select ''Email account'' | ||
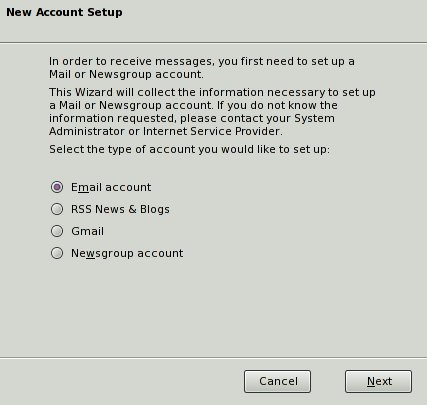
| − | [[File:Thunderbird_linux_add_account.jpg | + | [[File:Thunderbird_linux_add_account.jpg]] |
* Click ''Next'' | * Click ''Next'' | ||
* Identity | * Identity | ||
| Line 12: | Line 12: | ||
* Click ''Next'' | * Click ''Next'' | ||
* Select ''IMAP'' and enter '''imap.bx.psu.edu''' for ''Incoming Server'' | * Select ''IMAP'' and enter '''imap.bx.psu.edu''' for ''Incoming Server'' | ||
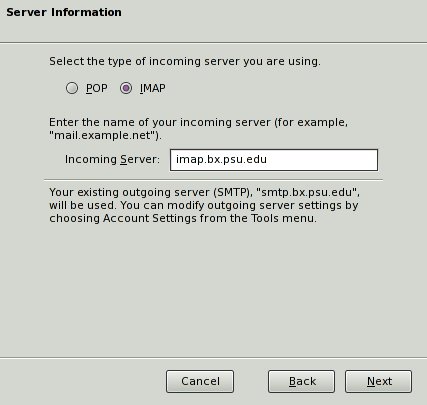
| − | [[File:Thunderbird_linux_enter_incoming_server.jpg | + | [[File:Thunderbird_linux_enter_incoming_server.jpg]] |
* Click ''Next'' | * Click ''Next'' | ||
* Enter your BX username for ''Incoming User Name'' | * Enter your BX username for ''Incoming User Name'' | ||
| Line 21: | Line 21: | ||
* Select ''Server Settings'' under the account you just created from the list on the left. | * Select ''Server Settings'' under the account you just created from the list on the left. | ||
* Verify that ''Port'' is set to '''993''' and that '''SSL''' is selected under ''Security Settings'' | * Verify that ''Port'' is set to '''993''' and that '''SSL''' is selected under ''Security Settings'' | ||
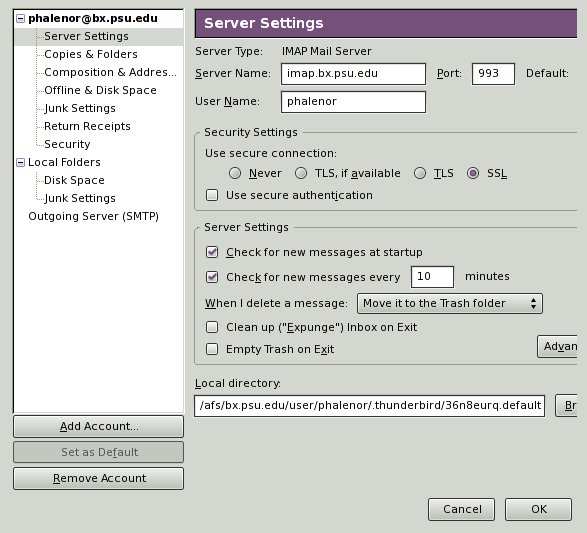
| − | [[File:Thunderbird_linux_imap.jpg | + | [[File:Thunderbird_linux_imap.jpg]] |
* Click ''Advanced'' under ''Server Settings'' and '''un-check''' ''Show only subscribed folders'' if you wish to see every folder on the server | * Click ''Advanced'' under ''Server Settings'' and '''un-check''' ''Show only subscribed folders'' if you wish to see every folder on the server | ||
| + | [[File:Thunderbird_linux_server_advanced.jpg | ||
* Click ''OK'' | * Click ''OK'' | ||
* Click ''OK'' | * Click ''OK'' | ||
Revision as of 18:32, 19 February 2010
These are instructions for configuring Thunderbird under Linux. Thunderbird 2.0.0.x was used for the screenshots. Other versions of Thunderbird, and Thunderbird under other operating systems may be slightly different.
Configuring IMAP
- Click Edit -> Account Settings
- Click Add Account
- Select Email account
- Click Next
- Identity
- Enter Your name as you would like it to appear
- Enter <yourusername>@bx.psu.edu
- Click Next
- Select IMAP and enter imap.bx.psu.edu for Incoming Server
- Click Next
- Enter your BX username for Incoming User Name
- Click Next
- Accept the defaults for Account Name
- Click Next
- Click Finish
- Select Server Settings under the account you just created from the list on the left.
- Verify that Port is set to 993 and that SSL is selected under Security Settings
- Click Advanced under Server Settings and un-check Show only subscribed folders if you wish to see every folder on the server
[[File:Thunderbird_linux_server_advanced.jpg
- Click OK
- Click OK
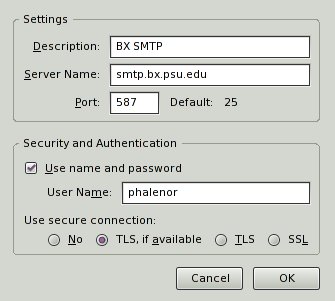
When selecting Get Mail for the first time, you should be prompted for a password. This is your BX Account password.


